Showing posts with label Customize. Show all posts

Tutotrial Make Background In Entry


Background of a post normally will follow the default settings specified in blogger. But there is one trick that can be used to make different background required for entry only.

Tutorial to make a background for the post is so easy.

Click Here to see the sample

What's the great thing is, you can select whatever image you want for background, and you can choose to be put in the post for which one for your blog.

When you login to your blog, put this code in your new post. (make sure when this code is paste, your new post in the 'edit html'
<div style="background:url(url picture/image) no-repeat;">
Your article content here</div>

That's it.
When you post you will see the effects.

p / s:
-make sure you select the suitable background that visitors are not dizzy reading your blog.

Tutorial Image Magnify

Magnify image is one of the distinctive impression that use of the images posted in the entry for mencantikkan sesebuah It was more unique and make Siwak ² compared to see another picture.

Sample images are applied to magnify this image may be found below


Here is a tutorial to magnify this image.

1) Copy the code below and place it in HTML / javascript in your blog.
(The dashboard> layout> add page element> HTML / javascript)
<script src="http://ajax.googleapis.com/ajax/libs/jquery/1.3.2/jquery.min.js" type="text/javascript"></script><script src="http://www.yourjavascript.com/610310434009/unwanted86.blogspot.com.js" type="text/javascript">

2) Then, Save the code

Next, is the code you need to put together with the url you want to post pictures in the blog .. (just need to put the code base once. Code is required to make under the effect of the picture.)
<img src="url files here" class="magnify" data-magnifyby="2" style="width:200px; height:150px cursor: url(magnify.cur), -moz-zoom-in; " />
  • url files here: Enter the picture url.
  • 2: Scale expansion. Depending on the width and height. Values ​​greater than 1 will enlarge the picture, a value of less than one will reduce the picture examples 0.5
  • 200: Enter the width of the picture that you think is appropriate
  • 150: Add high-image that you feel appropriate

Links In Blog Colorful (Rainbow Link)

Rainbow link is one trick that is applied to a link within a blog. as long as the mouse cursor is passed on something link, the link will turn into colorful with a specific color.

Click here to see examples of blogs that use a trick colorful this link.


Tutorial to make your blog colorful link is as follows.

1.) Copy the code below.

<script src="https://sites.google.com/site/unwanted86/javascript/rainbowlink.js" type="text/javascript">
</script>

2) Open your blog dashboard, then go to layout> page elements> add a gadget

3) Find add HTML / javascript. Then when it is open, paste the code kat situ.

4) Ready and save.

New Links Open When Click On Photo

Click This Picture To See Demo
When uploading images using the same methods available by blogger.com, by default the file will be opened on the same page.

There were times when it is great when referring to the same blog, but less good when a blogger to refer to other places. because when open on the same page, visitors had to press the back button to return to the original blog.

This tutorial will explain how to make the image with a link will open in a new tab when clicked.

Do not be surprised if the tutorial is very easy. :)


List Website For Download Free Blog Template


Before changing the template of a blog, what is needed is a template to be changed. A blog owner must knew how to use templates for their blogs.

If you are a blog owner and not yet have a template to be used, you can get a variety of free templates and a wide range deemed appropriate for your blog.

Blog template is the format. Xml (by that make sure if you download the file in a zip / rar, you extract the file first.)

Here are some websites that provide a variety of templates for bloggers free.

How To Change the Blog Template

Change the blog template can change the look of the original blog to look more attractive.
It is common for a blog owner wants his blog to appear attractive compared to the original template.

This tutorial will explain simple ways to change the template of a blog.

Before changing the blog template, make sure you have the required template.

Here are the steps to change the blog template.

1. Login account and then from the dashboard click design -> edit html -> . Click choose file


2. Read the description on the image below.


1. Select the template you've downloaded
2. Click open
3. Click the upload

3. Upon clicking the upload, the following display will go out, click on the 'keep the widget'

4. Once finished you can view your blog.

Backup Template Blog

Template for a blog can be viewed as the backbone of the template store blog for all information relating to the appearance of your blog, blog functions as well as most of the trick to a blog will be done in the template (edit html).

You put the background to, change the color to, put the 'read more' or pape, mainly in the template.
It is therefore necessary for a blogger blog template will backup first before doing any modifications or before changing the new template.
The purpose of backup is to backup template if any change in the code are not to be applied.

Tutorial for the backup template for a blog is as follows.


1) Login as usual. Then click the design and edit html of the dashboard
2) From the layout, click the edit html and you will meet a little below "download full template"
3) click save .. Done. :)


How to Put Code HTML / javascript

When entering the blogging world, many things that can not be avoided is to decorate their own blog. There are several ways to decorate the blog either change the template, install widgets provided by blogger.com ² or put other resources from outside which usually involves html / javascript.
In addition to decorating blog, html / javascript ² also has other functions depending on the purpose for which the code is generated.


The addition will normally want to do the same through the code obtained should be in 'paste'kan in space html / javascript.

This tutorial will show you how to put the html / javascript for a blog.


1) Log into your blog as usual. Then from the 'dashboard', click 'Design'
UPDATE: for latest template, click on the DESIGN


2) Once you click the 'design', he will auto enter the "page element. Then in 'page element' you, click on 'add a gadget'


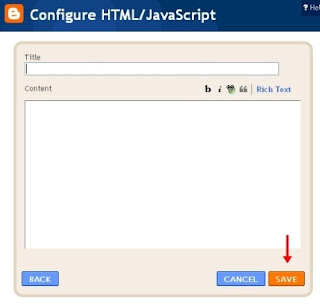
3) Next you will see many that have, search for "HTML / javascript", then click on the "+"


4) A blank screen will open, and then paste the code that you want to put the blog into the empty space. then press "save"


5) Completed. You can see the results by clicking the preview. You can also change the position of the code with only drag on any page element itu.Apabila ² area you're satisfied, click 'save' to keep the position


Post Entries in Blog

Post entries in the blog is the most basic things for a blogger.
In your entry will type what you want to address whether the expressions of partnership, info and anything else you want.


Here is how you want to start the step to type in your blog.

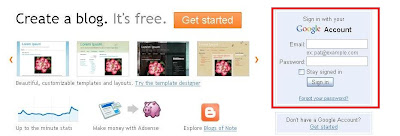
1. Go to www.blogger.com link (this link is required each time you login to blogger account). Enter your email and password.

Log in Blogspot

2. On the display front page, click on the 'new posts'

3. Enter a title for your entries and also the content of your entry. (Regular chapter takes to type an entry).

Then when you are ready, click on the button 'publish'

4. When you have press the publish button, ready for an entry in your blog
  • if you want to see 'look' of your entry, click on 'view post'
  • if you think there are shortcomings and want to edit, click on 'edit post'
  • if you want to type a new entry, click on 'create a new post (you can also start from the beginning by clicking on the' dashboard 'at the top-right)